Requirements
- Install RetroArch – Download RetroArch Here
- Obtain Amiga Kickstart ROM (BIOS) files – This is optional as PUAE has a built-in Kickstart ROM, but to ensure maximum compatibility, I recommend using actual Amiga Kickstart ROM files. These can be legally purchased as part of the Amiga Forever by Cloanto. A useful tip is to purchase the Amiga Forever Essentials Android app, this app also contains the Amiga Kickstart files you will need and is very cheap to buy.
- Have at least one Amiga game ready to test – These are usually .adf files.
- To play games, you will ideally need a controller – You can try using keyboard controls, but Amiga games are best experienced using an old-school joystick. The Competition Pro USB is best for playing Amiga games with an emulator.
Step 1 – Downloading The PUAE 2021 Core In RetroArch
The first step is to download the PUAE 2021 core in RetroArch.
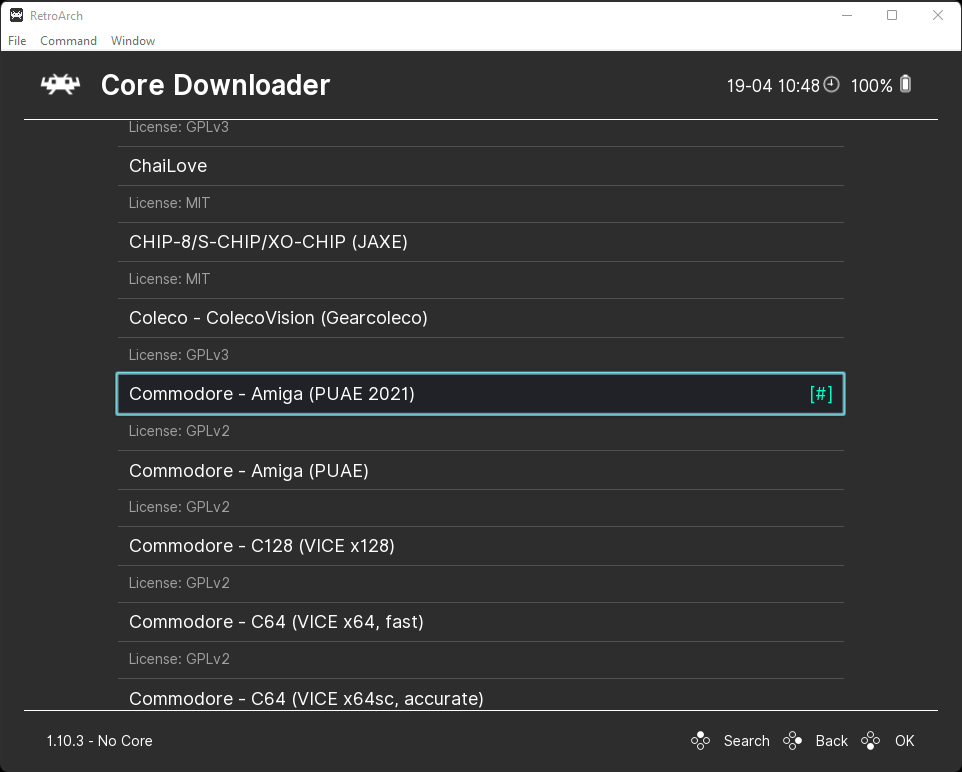
Boot up RetroArch, select ‘Load Core’, and then ‘Download a Core’, then scroll down the Core Downloader list until you reach ‘Commodore – Amiga (PUAE 2021)’. If your version of RetroArch is not showing the PUAE 2021 core, just download the regular PUAE core.
Select this and the PUAE core will download and install.
Assuming RetroArch is pre-installed on your system, it is advisable to return to the main menu, navigate downward to ‘Online Updater,’ and subsequently select ‘Update Core Info Files’ and ‘Update Databases.’
Executing these updates on vital RetroArch files and databases guarantees their currency, thereby minimizing the likelihood of encountering any complications.
Step 2 – Copy The Amiga Kickstart Files To RetroArch
If you are using actual Amiga Kickstart ROM files, these will need to be copied to the RetoArch ‘system’ folder. You will only need to copy those that you plan to use, but if you are able to obtain all of the files, simply copy them all across.
I typically use the A1200 Kickstart for most games, but where there may be compatibility issues, especially with older games, it’s often better to use the A500 Kickstart.
I recommend copying at least the A500 & A1200 Kickstarts to the RetroArch system folder.
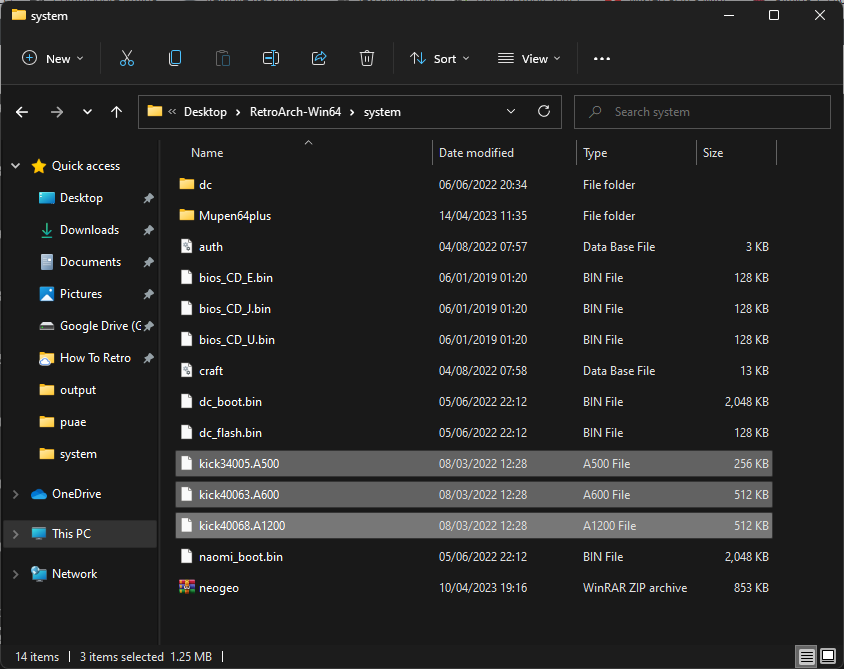
It is worth noting that PUAE in RetroArch requires BIOS files to be named and matched accordingly. The below list is taken from the PUAE Libretro site and provides details as to what the file names should be for the Amiga Kickstart files.
PUAE possesses a moderately compatible built-in AROS Kickstart, functioning as a fallback when the appropriate Kickstart remains undiscovered.
Both Amiga Forever and TOSEC filenames are recognized and accepted by PUAE.
| Filename | Amiga Forever | Description | md5sum |
|---|---|---|---|
| kick33180.A500 | amiga-os-120.rom | Kickstart v1.2 rev 33.180 | 85ad74194e87c08904327de1a9443b7a |
| kick34005.A500 | amiga-os-130.rom | Kickstart v1.3 rev 34.005 | 82a21c1890cae844b3df741f2762d48d |
| kick37175.A500 | amiga-os-204.rom | Kickstart v2.04 rev 37.175 | dc10d7bdd1b6f450773dfb558477c230 |
| kick37350.A600 | amiga-os-205-a600.rom | Kickstart v2.05 rev 37.350 | 465646c9b6729f77eea5314d1f057951 |
| kick40063.A600 | amiga-os-310-a600.rom | Kickstart v3.1 rev 40.063 | e40a5dfb3d017ba8779faba30cbd1c8e |
| kick39106.A1200 | amiga-os-300-a1200.rom | Kickstart v3.0 rev 39.106 | b7cc148386aa631136f510cd29e42fc3 |
| kick40068.A1200 | amiga-os-310-a1200.rom | Kickstart v3.1 rev 40.068 | 646773759326fbac3b2311fd8c8793ee |
| kick39106.A4000 | amiga-os-300-a4000.rom | Kickstart v3.0 rev 39.106 | 9b8bdd5a3fd32c2a5a6f5b1aefc799a5 |
| kick40068.A4000 | amiga-os-310-a4000.rom | Kickstart v3.1 rev 40.068 | 9bdedde6a4f33555b4a270c8ca53297d |
| kick34005.CDTV | amiga-os-130-cdtv-ext.rom | CDTV extended ROM v1.00 | 89da1838a24460e4b93f4f0c5d92d48d |
| kick40060.CD32 | amiga-os-310-cd32.rom | CD32 Kickstart v3.1 rev 40.060 | 5f8924d013dd57a89cf349f4cdedc6b1 |
| kick40060.CD32.ext | amiga-os-310-cd32-ext.rom | CD32 extended ROM rev 40.060 | bb72565701b1b6faece07d68ea5da639 |
| kick40060.CD32 | CD32 KS + extended v3.1 rev 40.060 | f2f241bf094168cfb9e7805dc2856433 |
Step 3 – Using ADF Files To Play Games
ADF means ‘Amiga Disk File’ and are single file dumps of Amiga disks, essentially what you would have put into the disk drive of your old Amiga! With PUAE, we are using ADF files as replacements for these original floppy disks, and have to be treated as such.
Playing Single Disk Games With PUAE
To play a single disk game, such as Stunt Car Racer, from the main menu in RetroArch, select ‘Load Content’, navigate to where your game ADF file is stored and select it.
PUAE will then boot your game.
Playing Multiple Disk Games With PUAE
Because Amiga games often came on more than a single disk, it is necessary to have to swap disks during the game.
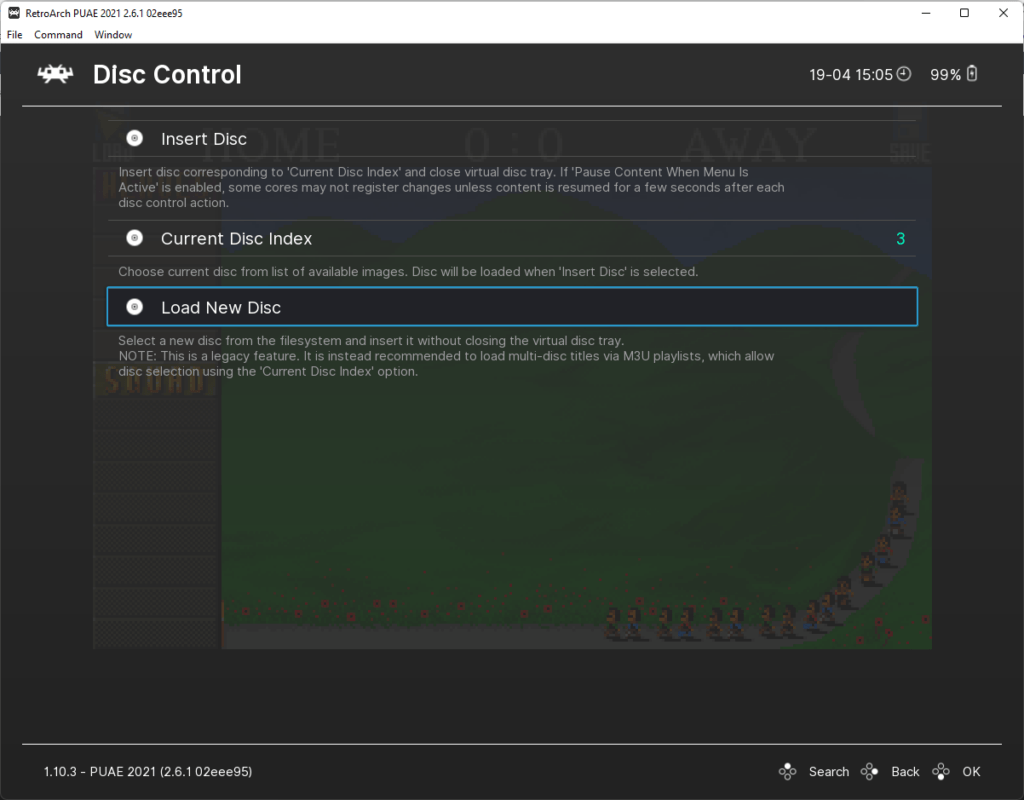
This is possible in RetroArch in a couple of ways, the first is by using the Disc Control feature in RetroArch to swap disks. To do this, press F1 to access the Quick Menu and select the following options:-
- Disc Control
- Eject Disc
- Load New Disc
- Select the Disk you need to Use
- Insert Disc
- Press F1 to return to your game
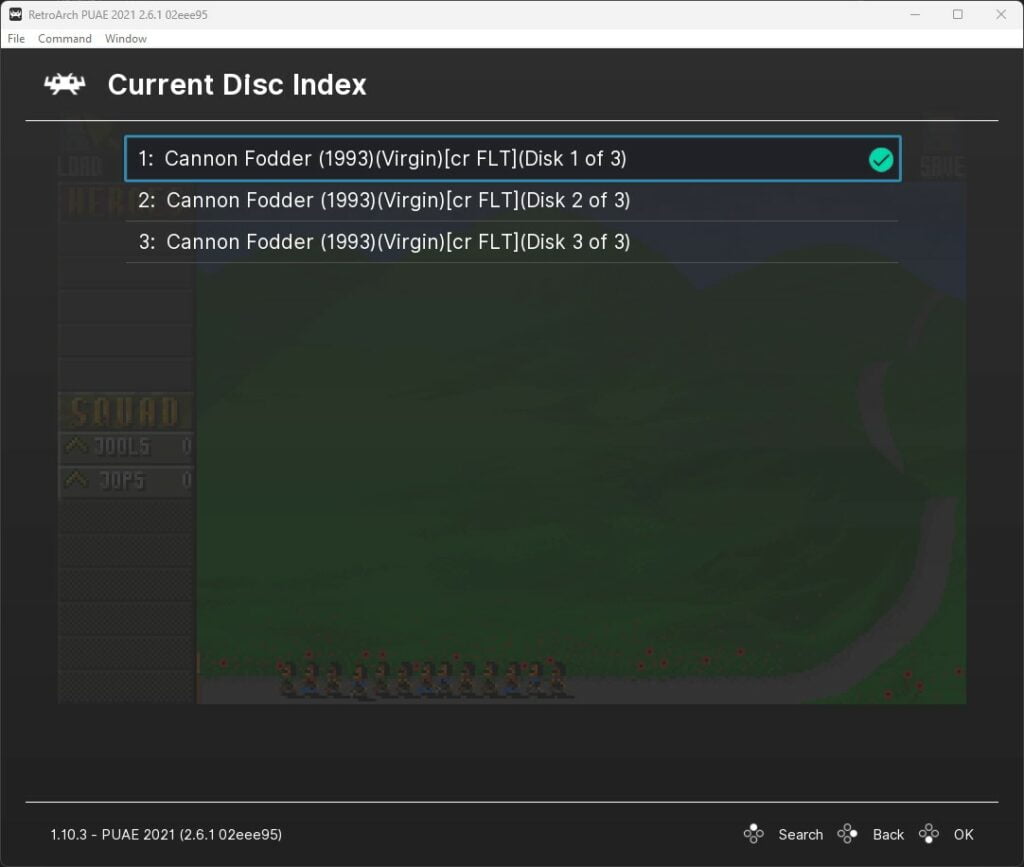
PUAE will now add this disc to the ‘Disc Index’ and use the disk you have selected. If you need to reinsert a previous disc, simply go back to the Disc Control menu, select ‘Current Disc Index’, and select the appropriate disk from the list.
Playing Multiple Disk Games Using .M3U Files
If you prefer to keep things a little tidier in RetroArch, it is possible to create ‘.M3U’ playlists for each game, which are essentially a text file that RetroArch can refer to, to understand how many discs are associated with a game.
The benefit of booting games via an .M3U file is that some will automatically swap disks, and some will not, but booting games via an .M3U file means that RetroArch Disc Control will know the playlist of disks for each game, making it easier to change disks when prompted.
Simply create a text file and enter the location of each Amiga disk file, one per line. Make sure to enter these in the correct chronological order, e.g. starting with Disk 1, etc.
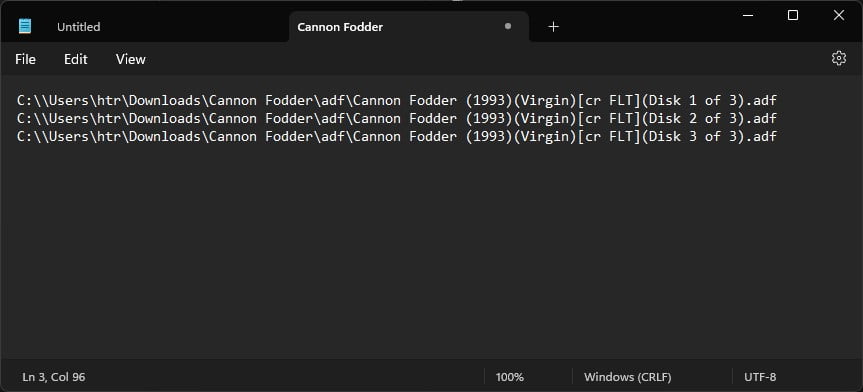
Once you have done this, be sure to save the file with a .m3u file extension.
You can do this by naming your file, changing the save as type to ‘All files’, and making sure your file name has .m3u at the end.
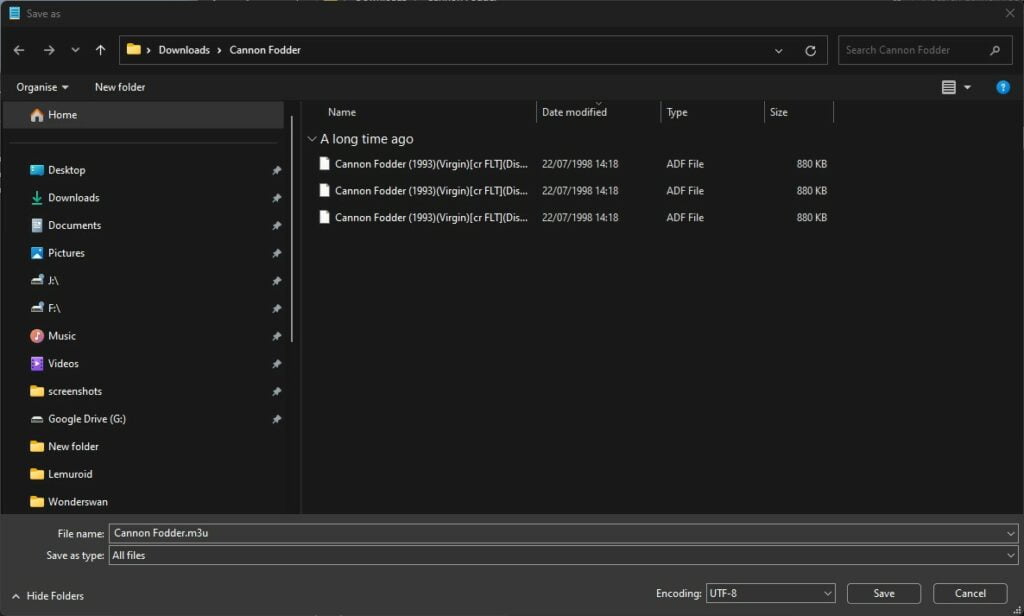
Once you have done this, you will be able to boot your game via the .m3u file you have created.
As mentioned earlier, some games will automatically swap the disks for you (these are typically games that on a real Amiga are able to utilise multiple disk drives), but some games do not.
If you find the game does not automatically swap disc, press F1 and select the below options from the RetroArch menu:
- Disc Control
- Eject Disc
- Current Disc Index
- Select the Disk you need to Use
- Insert Disc
- Press F1 to return to your game
PUAE will then load the data required from the disk you have selected.
Step 4 – RetroArch Amiga Settings
The PUAE core boasts an array of options, allowing you to fine-tune your amiga emulator for an optimal experience.
To access these options, press the F1 key or your designated hotkey to pause the emulation and enter RetroArch’s quick menu and scroll down the menu and select ‘options.’
Here, you will gain access to an extensive range of PUAE core emulator options, encompassing video, audio, and emulator performance.
For an in-depth understanding of the available options for the PUAE core, consult the RetroArch PUAE Core Options documentation.
Additionally, if you seek recommendations for Amiga games to enjoy with RetroArch, explore our best Amiga games article for all the must-play titles!

As a retro gaming & retro computing enthusiast, I enjoy sharing help guides and about retro gaming in general, when I have the spare time to do so!