Unbelievably, Sega Genesis / Mega Drive emulation has been around for almost 25 years now with GeneCyst being one of the early examples of a widely used emulator! RetroArch still remains a favoured way to access all your old Sega Genesis / Mega Drive classics across a number of platforms.
In this guide, we show you how quick and easy it is to get RetroArch set up to play your Genesis / Mega Drive favourites.
What You Will Need
- RetroArch Installed – Download from https://www.retroarch.com/
- Some Sega Genesis / Mega Drive ROMs in a folder
- Your favourite controller – Why not get yourself an officially licensed USB Sega Genesis/Mega Drive controller for ultimate authenticity.
Step 1 – Download Sega Genesis / Mega Drive Core
First of all, let’s start up RetroArch.
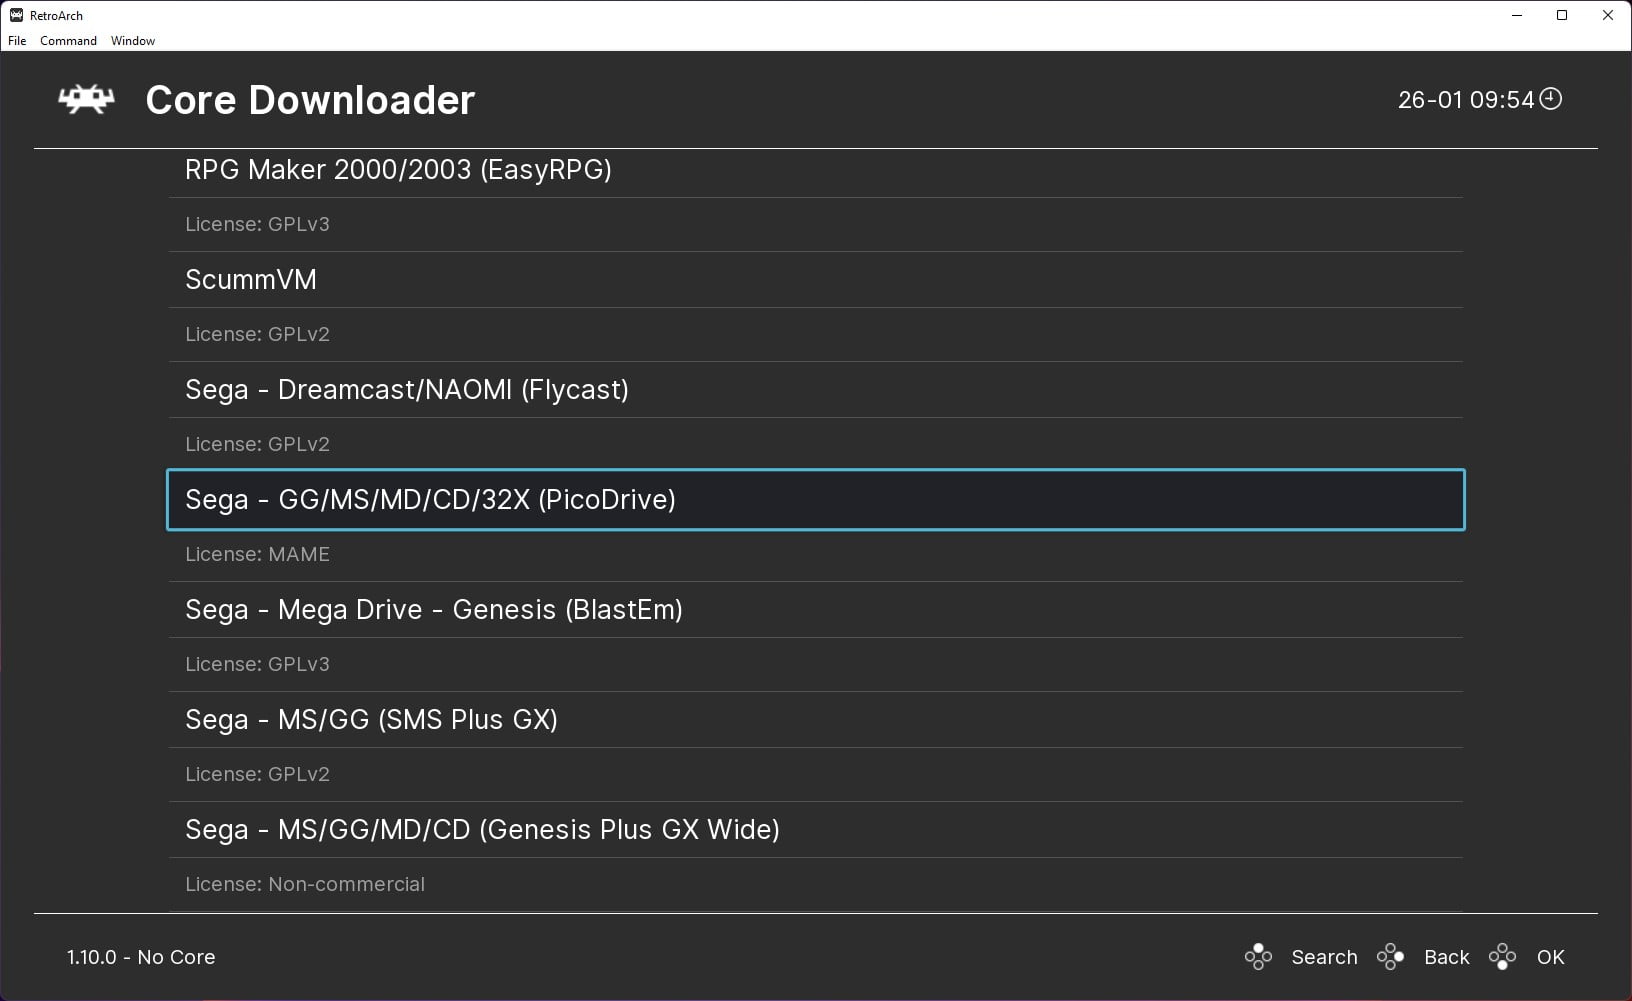
We’ll then locate and download our Sega Genesis / Mega Drive core of choice. In this guide, we are going to use ‘PicoDrive’.
Not only does PicoDrive emulate the Genesis / Mega Drive, but it also covers pretty much the whole range of Sega systems of this era including the Master System, Game Gear, Sega CD / Mega CD & 32X, so it’s an excellent choice.
To download, go to ‘Load Core’, then ‘Download a core’ and select ‘PicoDrive’.
Once you have downloaded PicoDrive, go back to the main menu and scroll down to ‘Online Updater’.
Next, we are going to select ‘Update Core Info Files’ and ‘Update Databases’ to ensure everything is as up-to-date as possible regarding any existing cores and associated databases.
Next, quit RetroArch and restart.
Step 2 – Scan for Games & Create a Genesis / Mega Drive Playlist
One of the great things about RetroArch is its ability to create playlists for systems, keeping your game collections nice and organised.
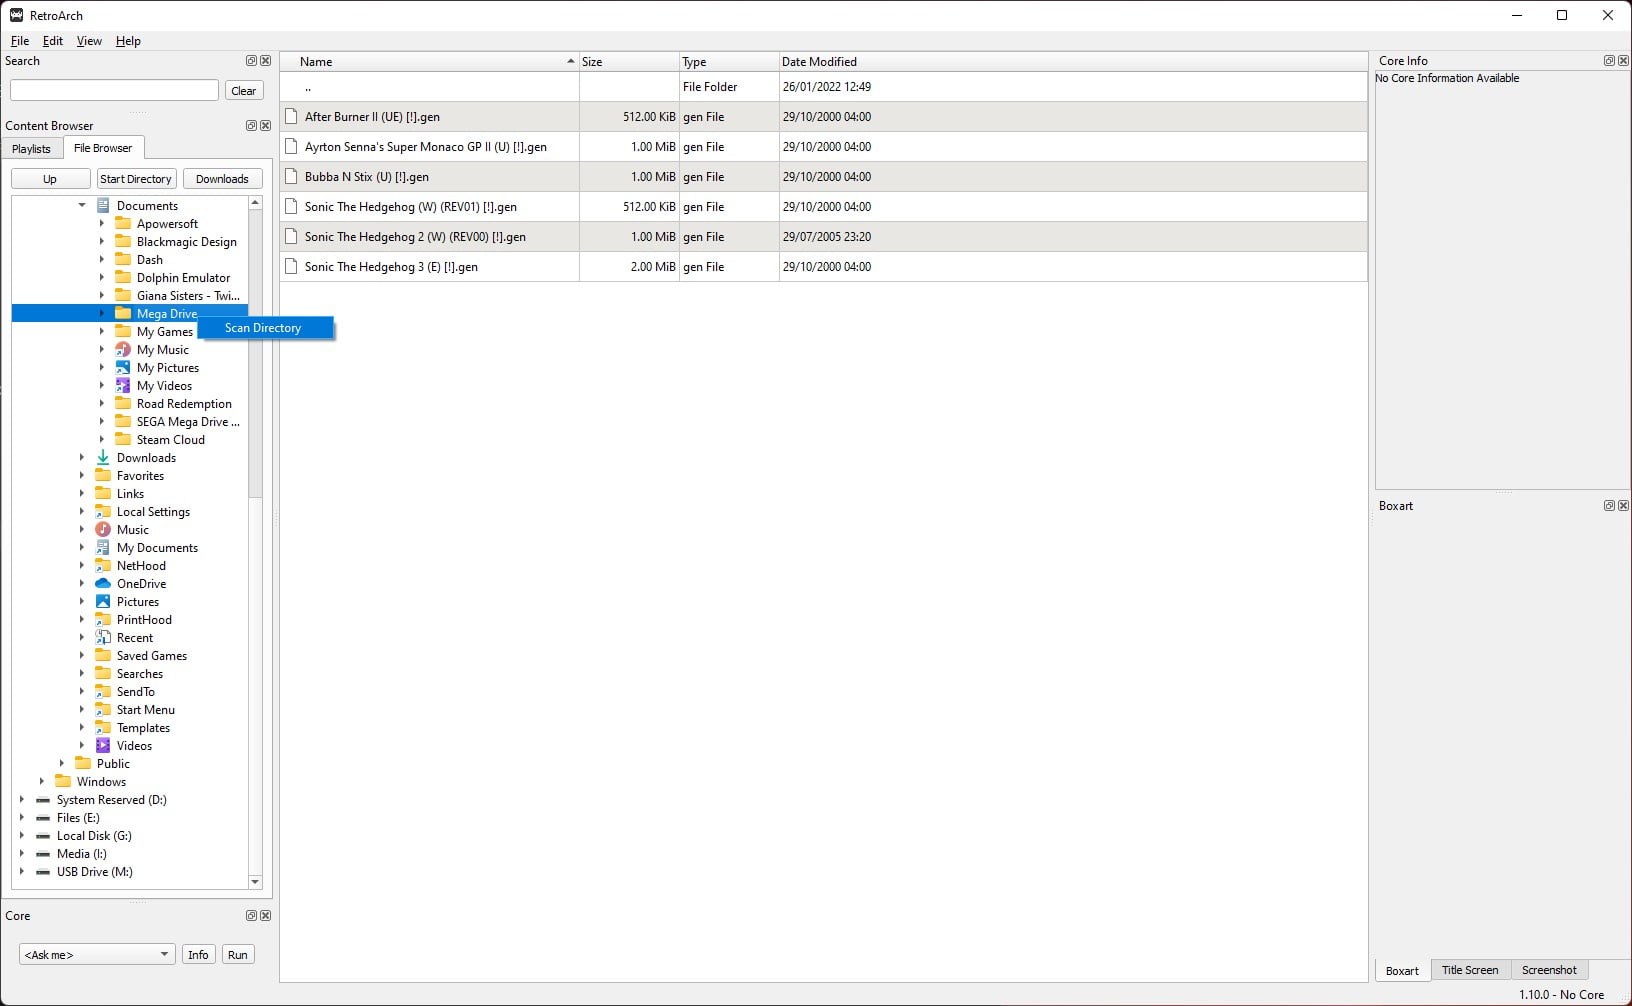
Go to the main menu and select ‘Show Desktop Menu’, this will display the desktop window where it is easier to access some more of the set-up options.
Next, find your Genesis / Mega Drive ROMs via the File Browser tab, right click and select ‘Scan Directory’.
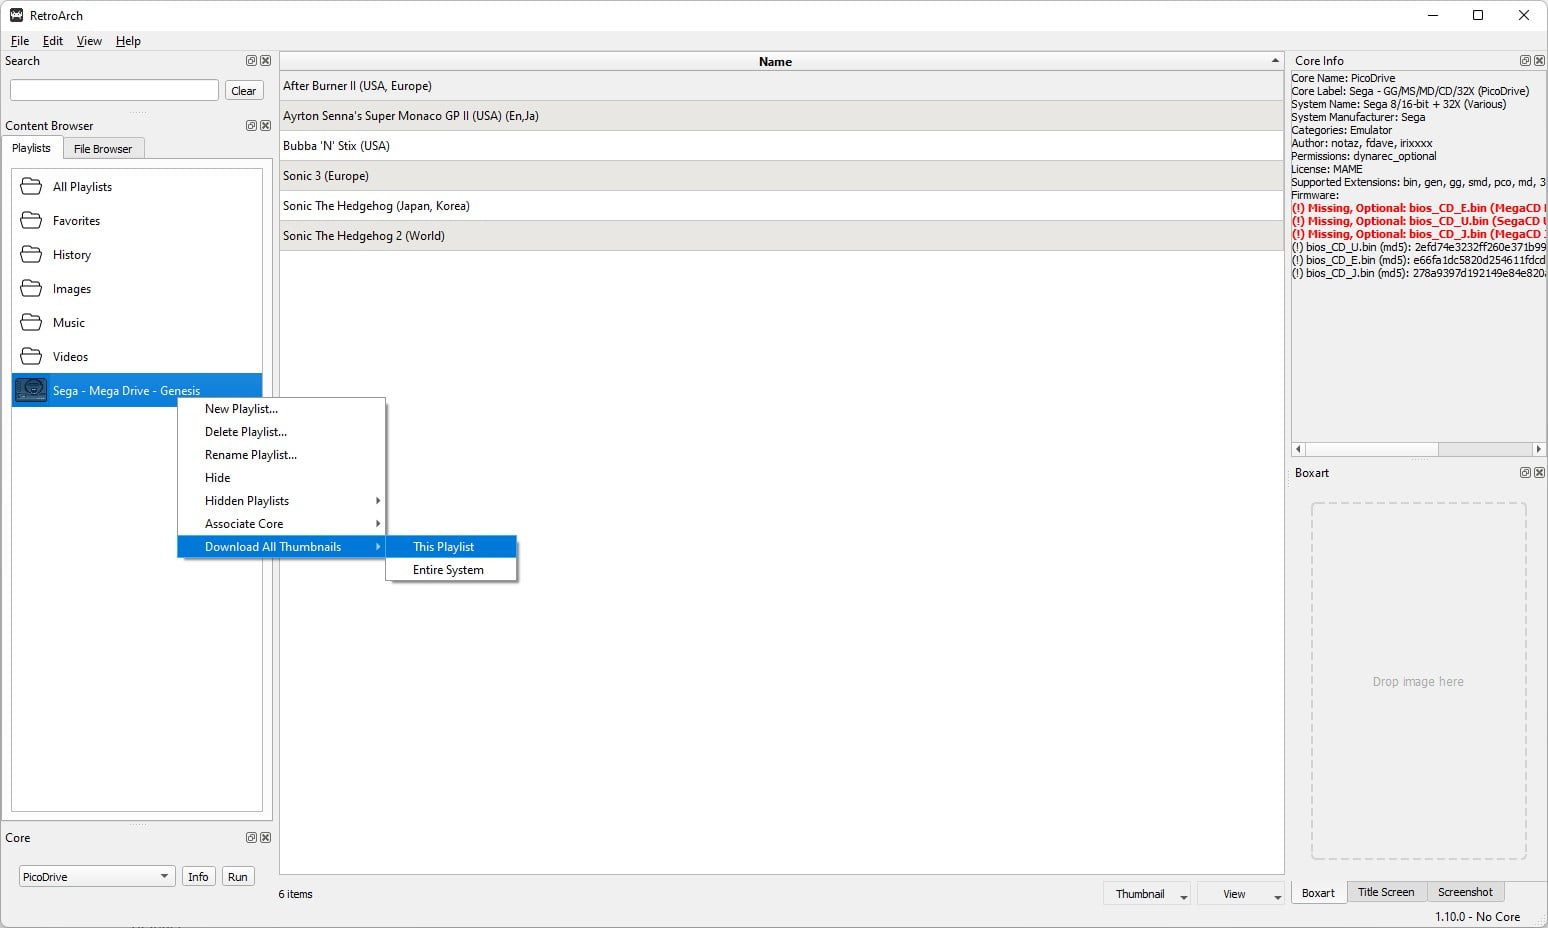
Go back to the Playlists tab and you will now see a Genesis / Mega Drive playlist has been created along with the games in your folder/archive.
If you are looking for inspiration for what games to play, check out our Best Sega Mega Drive Games article.
Step 3 – Select Default Genesis / Mega Drive Emulator
We now want to let RetroArch know which emulator core to use when playing Sega Genesis / Mega Drive games by default, so right-click on the Genesis / Mega Drive playlist you have created and go to ‘Associate Core’ then select PicoDrive.

This will now ensure that when you boot a Genesis / Mega Drive game, PicoDrive will be used as the emulator core.
Step 4 – Download Box Art Thumbnails
RetroArch also displays the box art / screenshots of games if you wish. If you want to download artwork thumbnails for when you are browsing your games, go to the Genesis / Mega Drive playlist that has been created, right-click and select ‘Download all thumbnails’ then select ‘This Playlist’.
This can take some time if you have hundreds of games, so maybe go make yourself a tea/coffee whilst it’s doing its thing.
Otherwise, you’re ready to play!
Step 5 – Playing Games
Close down the desktop menu and go back to the RetroArch frontend. Scroll across to the right (or down, depending upon which theme you are using) and you will see the Sega Mega Drive / Genesis playlist that has been created along with your games.
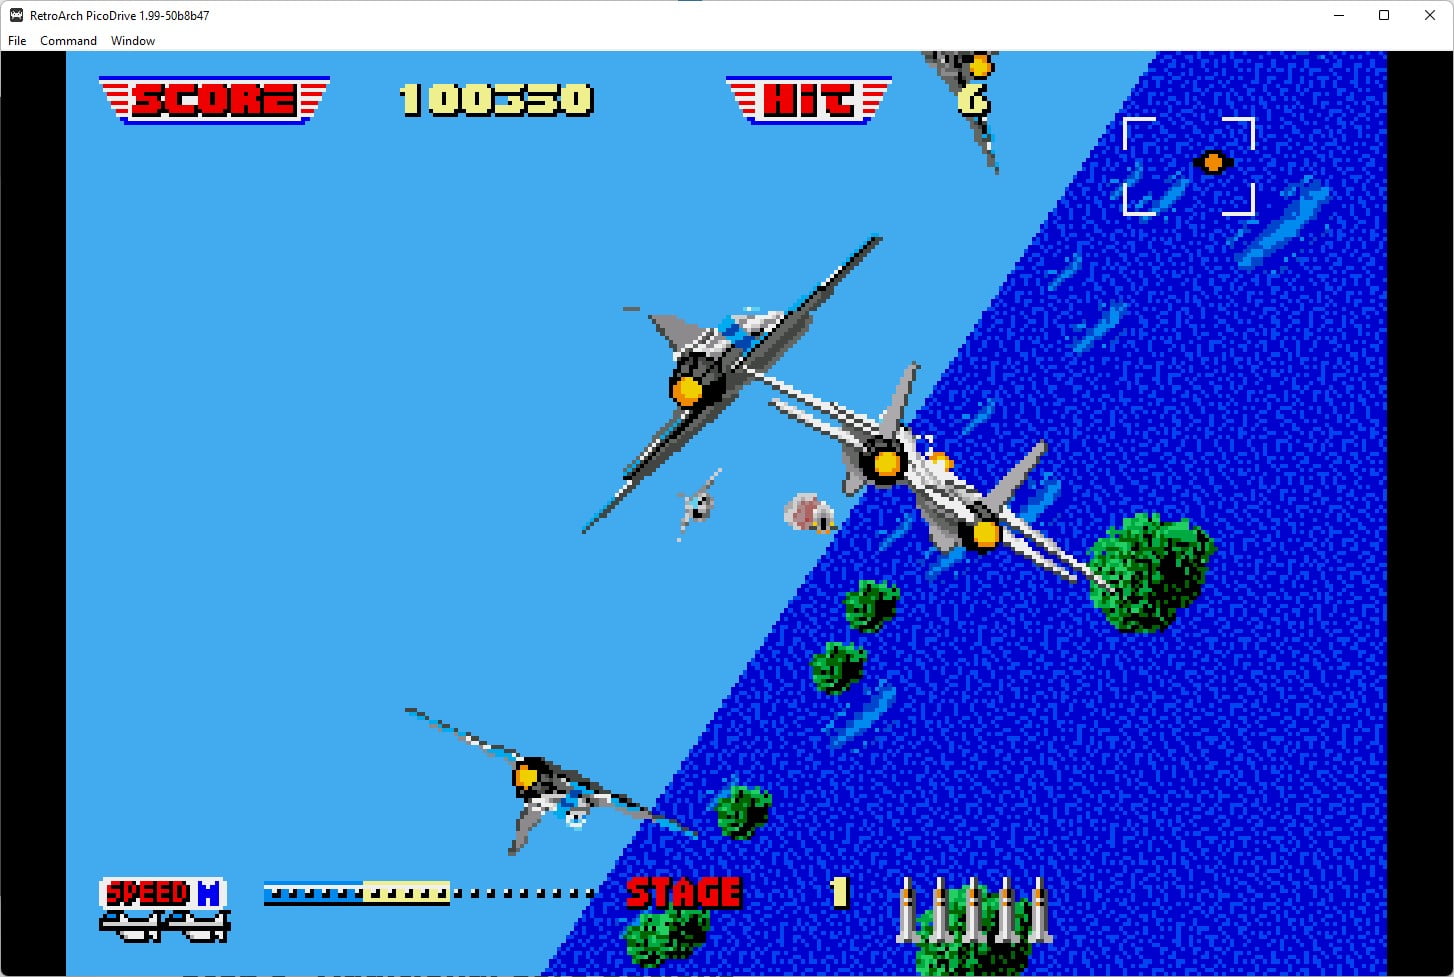
To boot a game, select a game and press ‘Run’ to start the game.
Step 6 – Additional Core Options
Press F1 to suspend the game and go back to the RetroArch menu, you will find here lots of tools and useful features such as save states, control options, video shaders and emulator options.
Since this is emulation, we can benefit from increasing things and removing sprite limits in games (which prevents sprites flickering when there’s loads of action on screen for example).
RetroArch CRT Shaders
One feature which is very much a standard in emulation today is the use of shaders to recreate older screens such as CRTs. A quick and easy way to get a CRT-looking shader with scanlines on your Genesis / Mega Drive games is to do the following:-
- Press F1 whilst in-game to bring up the core options menu
- Scroll to the ‘Shaders’ option
- Turn on Video Shaders
- Select ‘Load’ and then the ‘shaders_glsl’ directory
- Select the ‘crt’ directory
- Then select your desired CRT shader preset. I tend to use zfast-crt.glslp as it’s a nice fast shader which doesn’t affect game performance
- Press F1 to return to your game
You’ll now have a retro-style scanline/CRT effect overlaying the game!
Check out more shader recommendations in our RetroArch shaders guide.
And that’s it, the Sega Genesis / Mega Drive is a really easy system to get up and running in RetroArch and one of the most complete in terms of performance and features.

A lifelong avid gamer and computing enthusiast, Matt has decades of Retro Gaming experience. Now over 40 years old, Matt now even considers himself retro, but fortunately, nobody has developed a Matt emulator (not yet at least!).